Cómo insertar formularios rellenables de ONLYOFFICE en una página web
Puedes añadir fácilmente un formulario en línea a tu sitio web, haciéndolo disponible para rellenar y descargar como PDF. Sigue leyendo este post para aprender a hacerlo.
Breve introducción
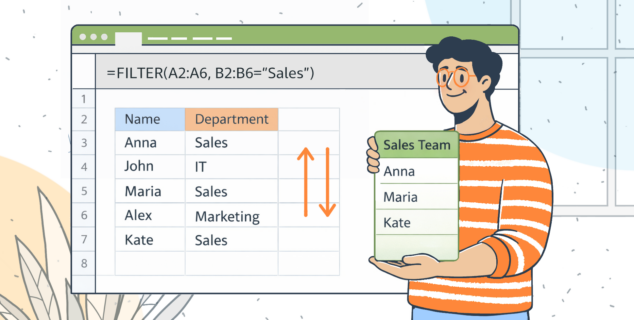
Pensamos que ya estás familiarizado con nuestros nuevos formularios. Si no es así, aquí tienes un breve resumen. A partir de la versión 7.0 de ONLYOFFICE Docs, puedes crear, editar y colaborar en formularios en línea, dejar que otros usuarios los rellenen y guardar los formularios como PDF.
A partir de la versión 8.0, hemos cambiado a PDF como estándar de la industria, aprovechando todas las ventajas de nuestro formato nativo. Por lo tanto, en los formularios de ONLYOFFICE, usted trabaja con dos formatos principales. DOCXF está destinado a la creación de plantillas de formularios a partir de archivos DOCX en blanco o de cualquier archivo DOCX existente. Los formularios listos se guardan y distribuyen en PDF.
Cómo abrir documentos DOCXF para editarlos en un sitio web
Encuentra y abre el archivo index.html de tu Servidor de Documentos ONLYOFFICE. Luego, conéctalo a la API del Servidor de Documentos. Es necesario especificar los parámetros de configuración para abrir una plantilla de formulario.
<script type="text/javascript"
        src="http://0.0.0.0:8080/web-apps/apps/api/documents/api.js"></script>
   // Specify the path to the API JavaScript file.
<button onclick="open_form_template()">Open Form Template</button>
   // Add a button to open the form.
<div id="placeholder"></div>
   // Add the element where the editor will be opened.
<script>
function open_form_template() {
    // Close the editor in case it is open.
    if (this.docEditor) {
        this.docEditor.destroyEditor()
    }
    // Create the full URL address to the form template you need to open.
    const url = window.location.protocol + "//" +
    window.location.hostname + “:” + window.location.port + ”/” + filename + ”.docxf”;
    // Add the key to identify the file for co-editing.
    const key = filename + ”.docxf”;
    // Create DocsAPI object with the document config and open the editor in the placeholder element.
    this.docEditor = new DocsAPI.DocEditor("placeholder",
    {
        “document”: {
            “fileType”: “docxf”,
            “key”: key,
            “title”: “Form Template”,
            “url”: url
        },
        “documentType”: “word”
    });
}
</script>
A continuación, puedes abrir una plantilla de formulario para editarla. Después de editar este archivo, puedes obtener el formulario. Para ello, haz clic en el botón “Guardar como pdf”.
Cómo abrir un PDF para rellenarlo desde una página web
Necesitas añadir un botón que abra el formulario para rellenarlo. A continuación, añade la función open_form_template().
<script type="text/javascript"
        src="http://0.0.0.0:8080/web-apps/apps/api/documents/api.js"></script>
   // Specify the path to the API JavaScript file.
<button onclick="open_form()">Open Form</button>
   // Add a button to open the form.
<div id="placeholder"></div>
   // Add the element where the editor will be opened.
<script>
function open_form_template() {
    // Close the editor in case it is open.
    if (this.docEditor) {
        this.docEditor.destroyEditor()
    }
   // Create the full URL address to the form you need to open.
    const url = window.location.protocol + "//" +
    window.location.hostname + ”:” + window.location.port + ”/” + filename + ”.pdf”;
    const key = filename + ”.pdf”;
    // Create DocsAPI object with the document config and open the editor in the placeholder element.
    this.docEditor = new DocsAPI.DocEditor("placeholder",
    {
        “document”: {
            “fileType”: “pdf”,
            “title”: “Form”,
            “url”: url
        },
        “documentType”: “pdf”
    });
}
</script>
Ten en cuenta que el campo key no se pasa a la configuración de los editores. Este campo se generará automáticamente como un número aleatorio. Esto permite independizar todas las sesiones de apertura del formulario. Por lo tanto, la colaboración en el archivo PDF está desactivada. Por eso, cualquier persona puede abrir el formulario y rellenarlo sin molestar a los demás.
Una vez hecho esto, se puede abrir un formulario para rellenarlo. Después de rellenar los campos (los obligatorios están resaltados con el borde rojo), es posible imprimir o descargar el formulario PDF.

Crea tu cuenta gratuita de ONLYOFFICE
Visualiza, edita y colabora en documentos, hojas, diapositivas, formularios y archivos PDF en línea.