How to number pages in Word documents
Page numbers play a crucial role in organizing and navigating through multi-page documents. Whether you’re preparing a report, an e-book, or any lengthy document, adding page numbers can significantly enhance readability and professionalism. Read this guide to learn how to number pages.

Why add page numbers to a document?
When working on a text document, we often have to take care not only of the content of our work, but also of its form. Just think of the academic sphere, for example, where the rules of text formatting are of crucial importance.
One of the most frequent requirements is undoubtedly page numbering, which is useful not only for those texts that are to be accompanied by a bibliography, but for any document that needs to be organized for ease of reading.
For reviews and edits, page numbers make it easier for collaborators to provide feedback, refer to specific pages, and track changes. They also help comply with legal, regulatory, or organizational requirements, which often mandate page numbers in contracts and official reports.
Additionally, page numbers facilitate document management processes such as archiving, retrieval, and indexing, making it easier to handle large volumes of documents.
Let’s see how to add page numbers using different tools.
ONLYOFFICE Document Editor
ONLYOFFICE is a powerful office suite that offers a range of editors for creating, editing, and managing documents. It includes ONLYOFFICE Document Editor, a text editor that supports the most popular file extensions.
It is supported by Windows, Linux and macOS, and it is available online, as a desktop application and on mobile.
To add page numbers, first of all open the editor and the document.
Next, go to the Insert tab and click on Header & Footer. Here, click on Insert page number and choose the position where you want the number to be displayed.

The number will appear in the chosen position.

Now, double-click on the number to customize its characteristics. Open Header and footer settings on the right.

Here, you will find the following options to adjust the parameters:
- Position: choose the position of page numbers on the page accordingly to the top and bottom of the page.
- Different first page: check this box to apply a different page number to the very first page.
- Different odd and even pages: use this box to insert different page numbers for odd and even pages.
- Link to Previous: this option becomes available only if sections have already been added to your document; otherwise, it will be grayed out. This option is also unavailable for the first section, meaning it can’t be used for headers or footers in that section. By default, this box is checked to apply unified numbering across all sections. When you select a header or footer area, it will be marked with the Same as Previous label. To use different page numbering for each section, uncheck the Link to Previous box, and the Same as Previous label will disappear.
- Page Numbering: it allows adjusting page numbering options throughout different sections of the document.
- Continue from previous section: this option is selected by default and makes it possible to keep continuous page numbering after a section break.
- Start at: this radio button is useful when you want to start page numbering with a specific number in the current section of the document. Just enter the required starting value in the field on the right.

- Number format: from this dropdown menu you can quickly change the format of the page numbers, e.g., I, II, III, IV…

Once you obtained the required result, just double-click on the Footer icon at the bottom, and you will see your customized page number.

And this is it! You can now proceed with writing your text or creating your bibliography.
If you need a powerful and versatile editor for professional text document management, try the Document Editor in the ONLYOFFICE Docs suite. This suite also provides excellent tools for handling spreadsheets, PDFs, presentations, and forms.
Take a look at all the new features you can find in version 8.1!
Microsoft Word
Microsoft Word is a widely used word processing programs, known for its robust features and compatibility with various document formats. It is part of the Microsoft Office suite, available for both Windows and macOS.
If you chose this program, launch it and open your document.
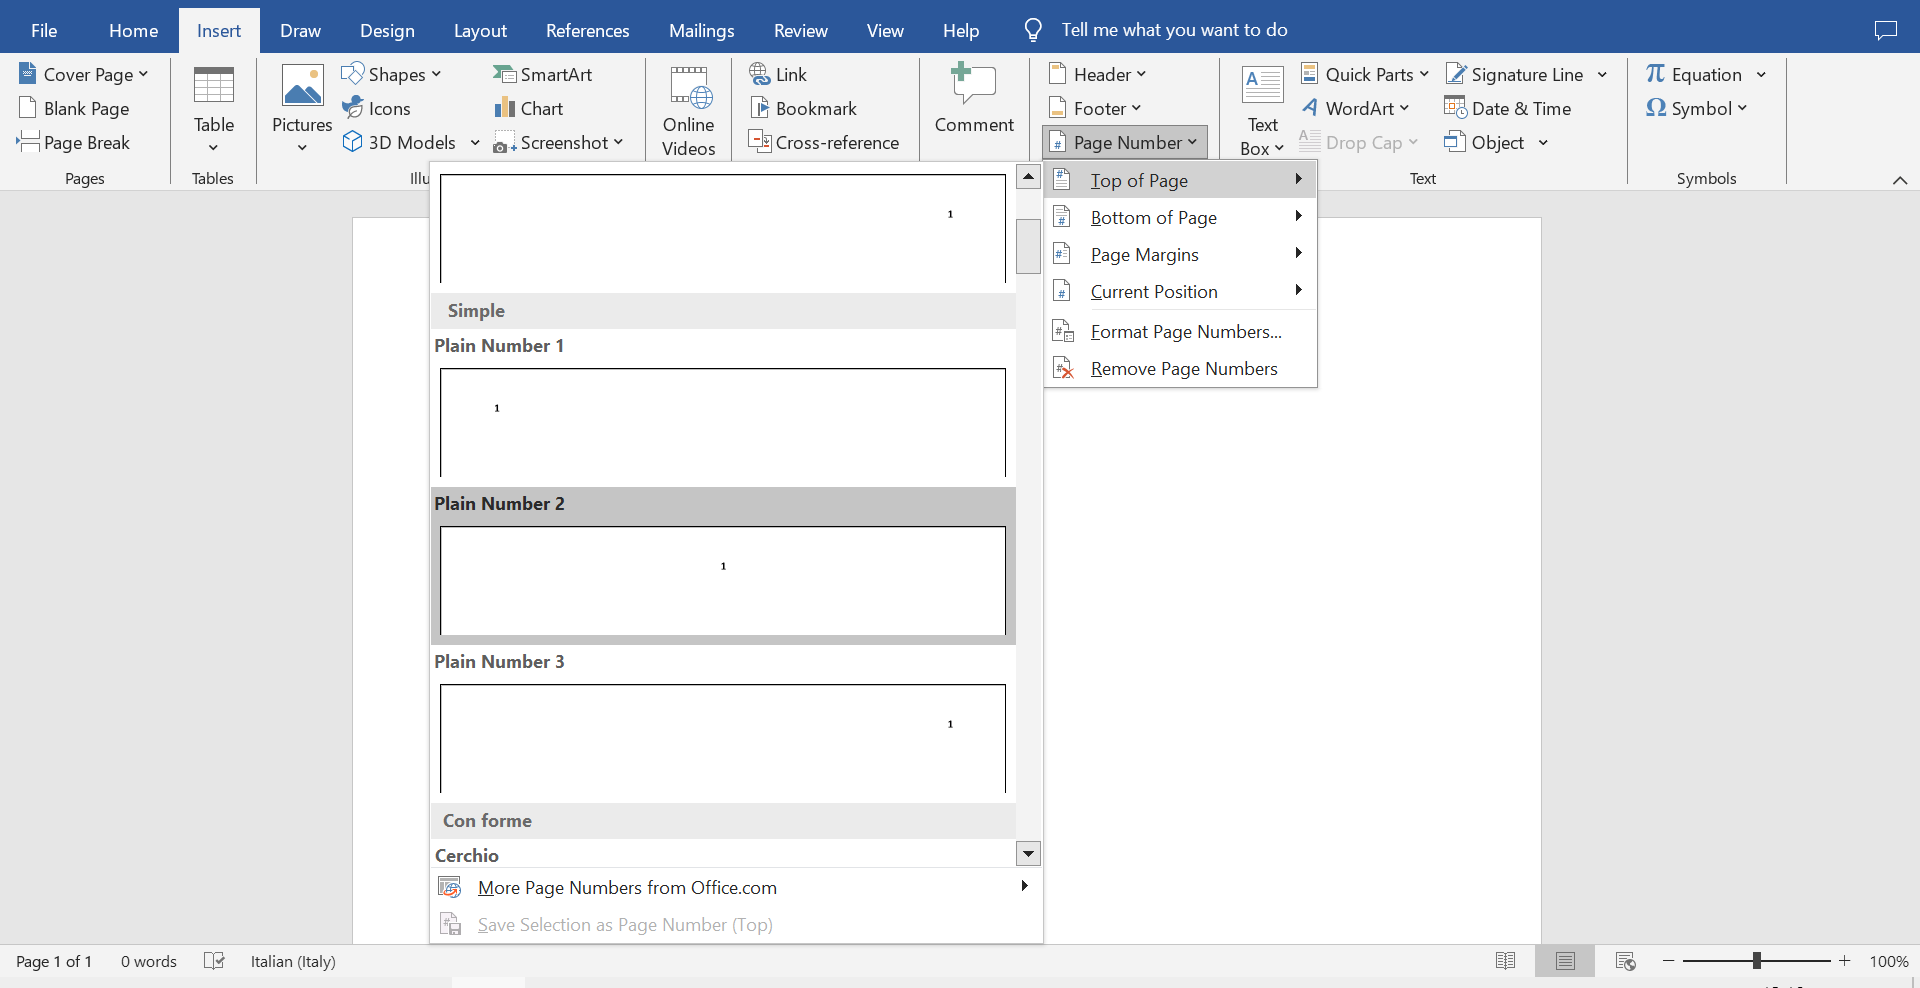
Go to the Insert tab on toolbar on top. Click on Page Number in the Header & Footer section.
Choose where you want to place the page numbers (e.g., top of page, bottom of page) and select a specific style from the gallery.

Now, click on Page Number again and choose Format Page Numbere. Here, you can select the desired number format (e.g., 1, 2, 3 or i, ii, iii), and choose where to start the page numbering from.
In the Header & Footer Tools Design tab, check Different First Page: this will remove the page number from the first page or allow you to format it differently.
LibreOffice Writer
LibreOffice Writer is a free and open-source word processing program that is part of the LibreOffice suite. It is a powerful alternative to Microsoft Word, supporting a wide range of document formats and offering extensive customization options.
To add page numbers, open your document in LibreOffice Writer.
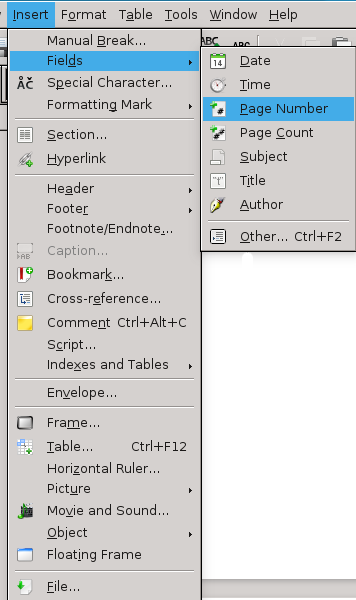
Go to the Insert menu and choose Fields, then Page Number.
Click in the header or footer where you want the page number to appear.

To change number format, right-click on the page number field you inserted.
In the dialog box, you can change the number format, such as using Roman numerals or starting from a specific number.
To have a different first page, go to the Format menu. In the dialog box, check Title page and specify the number of pages you want to be treated as title pages (usually just the first page).
This will exclude the first page from the numbering or allow you to format it differently.
Apple Pages (desktop for macOS)
MacOS users can rely on Pages, a word processing application that is part of the iWork suite, available for macOS and iOS devices. It is designed with a user-friendly interface and offers seamless integration with other Apple services and devices.
Open your document in Apple Pages.
Go to the Insert menu at the top and select Page Number and choose the position where you want the page numbers to appear (header or footer).
Click on the inserted page number to select it, and use the formatting options in the Format panel on the right to change the font, size, and style.
To change the numbering format or start at a different number, go to Insert > Page Number and select Page Numbering.
In the Section tab, check the Different First Page box. This will create a separate section for the first page, allowing you to customize its header or footer independently from the rest of the document.
Create your free ONLYOFFICE account
View, edit and collaborate on docs, sheets, slides, forms, and PDF files online.


