When design matters: how to create beautiful forms
Documents to be filled out are not always contracts, questionnaires, or forms for government agencies. It is also possible to create visually pleasing forms. Read this article to learn how to make a beautiful form without using professional design software, what they are used for, and where to find ready-made ones.

What are design forms?
First, let’s understand the difference between standard forms and forms with a design. Fillable forms are usually used for purchase agreements, lease agreements, or purchase offers. These documents contain text with fillable fields, small pictures, shapes, and diagrams. Often, such documents are created in Microsoft Office with the content controls function or in Adobe using the interactive fields.
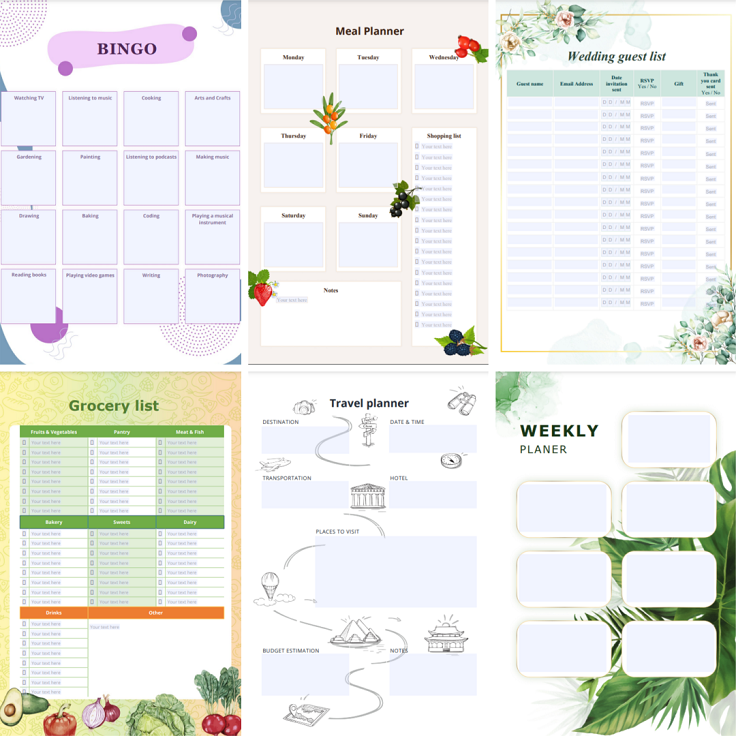
Forms with a design usually do not contain much text. In contrast, they are mainly composed of background pictures, figures, tables, and text or text arts. These are the categories where such forms can be helpful:
- Planning (checklists, daily schedules, meal plans, shopping lists);
- Productivity (5 whys forms, monthly goals, SWOT analysis, to-do lists);
- Sales (bills, proposals, pay stubs, invoices);
- Diagrams (fishbone diagrams, Frayer models, Venn diagrams);
- Sports and hobbies (bingo cards, recipe pages, football squares, soccer lineups).
You can create such forms using tools for designers, such as Crello, Canva, and Visme. They are graphic design tools that help you create professional marketing and advertising content, forms, posters, social media posts, website graphics, videos, and animations. Like most other graphic design programs, they offer a wide range of templates.
Why create forms with ONLYOFFICE form creator?
However, the task can be much easier to complete with the ONLYOFFICE form creator offers a set of fillable fields, like text, combo boxes, drop-down lists, checkboxes, radio buttons, email addresses, phone numbers, date, and images that are similar to the standard content controls but come with advanced field properties. It is especially suitable for beginners, as it gives the following advantages:
- No designer skills needed. You don’t need any professional skills to create forms in ONLYOFFICE, as you can do it with simple functionalities like inserting pictures, personalizing shapes, and adding fillable fields.
- User-friendly interface. Any user will find the interface familiar and will be able to get to work without wasting time learning the software.
- Universality. Forms created in ONLYOFFICE can be printed and filled out manually or used digitally on any device. Besides, ready forms are saved in PDF format and can be opened in any application that supports this format.
- Availability. The editor for creating forms is available in the online version. Plus, free desktop applications are available for all popular systems: Windows, Linux, and macOS.
Watch our video to learn more about ONLYOFFICE forms functionality:
Now, let’s see how to create a beautiful template in ONLYOFFICE editors.
How to create beautiful forms?
To try it in action, let’s create a birthday invitation template. First, open a document in DOCXF format that allows you to add fillable fields. Select Form template in ONLYOFFICE. Once the window opens, we’re ready to start creating our form.
Creating background
Now, we need to choose a background for our form. To do this, you can use your photos, pictures from stock images, or find a suitable one on the Internet. Please note that if you use an image from public sources, make sure that you are not violating the copyright.
To add a picture for the background, go to the Insert tab, on the top toolbar. Choose Image → Image from file. Then, find the necessary image from your storage.

Then, select Behind Text in Wrapping Style on the right-side toolbar or in the Layouts tab on the top toolbar. In this way, the picture will be in the background and won’t overlap the text and shapes we’ll be adding next.

Since the text may not be evident in our background, let’s add a figure that will overlap the picture. Go to the Insert tab → Shapes → Basic shapes → Rectangle. Then click and draw the shape by holding down the right mouse button.
You can place the shape exactly in the center of the sheet manually, using landmark lines that will appear automatically. Or you can adjust the shape position in the settings.
Click Show Advanced Settings on the right-side toolbar, then, go to the Position tab. Choose horizontal alignment Center, relative to Page. The same is for vertical alignment. Click OK.

Now, if you resize a figure, it will automatically be aligned to the center of the page.
Besides, you can personalize the shapes on the right-side toolbar. It is possible to choose to fill the shape with a gradient, texture, or picture, or leave it in one color to your taste, change the line width of the shape and its color.
Another useful feature here is Opacity. Set the opacity percentage of your shape from 100 (completely opaque) to 0 (invisible).

Adding text
After adding the background, we can move on to adding the invitation text. Double-click the shape and type the text for the invitation. On the top toolbar, select the size and font appropriate for your invitation.

Adding fillable fields
Finally, all that’s left is to add fillable fields. There, you will be able to enter information about the place and time of the birthday party. The field options are available in the Forms tab on the top toolbar. You can add text fields, combo boxes, dropdowns, checkboxes, radio buttons, and images.

Place the cursor where you want to place the field and click on the Text field.
In the field settings on the right-side toolbar, in the Placeholder field, specify Name to give you a hint as to what you want to specify in this field. You can also use a type for this. It will appear when you hover your cursor over the field.
In the Format field, specify that the answer can only contain letters.

In the same way, we add the other fields.

Now let’s add a date field for the birthday party.
Click the Date & Time button in the Forms tab. On the right-side toolbar, customize the field settings. Set the key, placeholder, and tip.
In the Default Value field, enter the value displayed in the field by default.
Display the date as follows: select the format of the field.

That’s it. Our form is ready. Now you can see a preview. Click View Form in the Forms tab. If everything is fine, save the form.
Use the Save as PDF button to quickly save the form in a PDF file to share or send to your friends for filling.
Form library
No time to make the forms yourself? You can use ready-made forms from our library. ONLYOFFICE offers a free library of forms where you can find everything from bills of sale and purchase agreements to beautiful checklists and planners. Read this post to learn how to navigate it or visit our library:
Access ready-made forms from the ONLYOFFICE interface
Now, you don’t have to visit the library if you need a certain form template. You can access our collection of free templates right in the program interface.
In ONLYOFFICE Desktop Editors, launch the app and click Templates on the left. You will see all the available forms in different languages and be able to sort them alphabetically.

In DocSpace, click the Actions button —> Form template —> Form Gallery

Create a free ONLYOFFICE DocSpace account to create forms online or get Desktop Editors for Windows, Linux, or macOS:
Create your free ONLYOFFICE account
View, edit and collaborate on docs, sheets, slides, forms, and PDF files online.


